VBA Ranges - Getting and Setting Cell Values
July 23, 2017
In the previous post, we introduced the VBA Range object. This gave us the foundation of working with Ranges in VBA. In today’s post, I’d like to discuss how to get and set cell values through VBA. This will continue to build up our understanding of the VBA Range object and how to use it. There are several ways you can get and set cell values with VBA and I’ll do my best to cover all the necessities, but at the same time keeping it short and to the point. Let’s get started.
Getting Cell Values
To get a cell’s value in VBA, we need to refer to it with the Range object and
then call the .Value property.
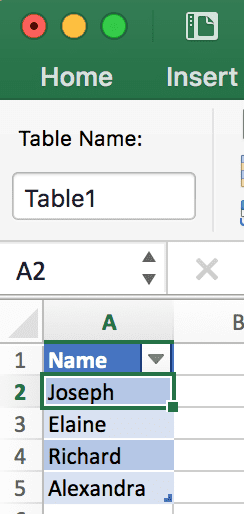
We’ll use the following spreadsheet for our example. It’s a simple table with some names in it.
To get the value from cell A2 you can use this code snippet:
Option Explicit

Public Sub GetCellValue()
    Dim val As String
    val = Range("A2").Value
    Debug.Print val
End Sub
This will take cell A2 and put it in the variable val. Then we print out the
value in the Immediate Window (which the value in our example is Joseph).
You can also set the range to a variable and access the value from that variable as well:
Option Explicit

Public Sub GetCellValue()
    Dim cell As Range
    Set cell = Range("A2")
    Debug.Print cell.Value
End Sub
What happens if you use .Value on a set of cells?
Let’s change our previous code snippet to the following:
Option Explicit

Public Sub GetCellValue()
    Dim cell As Range
    Set cell = Range("A2:A5")
    Debug.Print cell.Value ' will throw an error "Type Mismatch"
End Sub
If you run this code, you will get an error stating that there is a type mismatch.
What’s going on here?
The problem is that when you work with a set of cells, .Value can only return
a single value. So when we ask VBA to return .Value on our variable (which
refers to multiple cells), the .Value property doesn’t know which cell we are
referring to.
How do you get a single cell from a set of cells?
In order to use .Value to get a value from a cell, we need to refer to a
single cell from the range of cells in our variable. The way we do that is with
the Cells() VBA function.
The Range.Cells Function
The Cells() function is a way to take a range of cells and return a single
cell from the set. Here is the function defined:
Cells(row_number, column_number)| Parameter | Type | Definition |
|---|---|---|
row_number |
Integer | The row number from within the range that you want to refer to. |
column_number |
Integer | The column number from within the range that you want to refer to. |
Take a look at the following code:
Option Explicit

Public Sub GetCellValue()
    Dim cellRange As Range
    Set cellRange = Range("A2:A5")
    Debug.Print cellRange.cells(1, 1).Value
End Sub
Here we took the range of A2:A5 and referred to row 1 column 1. Since the
range variable cellRange refers to A2:A5, the first row is row 2 and the
first column is A.
BE CAREFUL!
When using the
Cells()function, remember that row 1 and column 1 represent the top-left most cell within the range that theCells()function is working on. If your range isA1:D5, thenCells(1, 1)will refer toA1, but if your range isB2:D6, thenCells(1, 1)refers toB2.
Ok, that covers getting cell values from range objects, now let’s discuss setting cell values with range objects.
Setting Cell Values
In order to set a cell’s value, you can use the same .Value property when
referring to a cell. In this example, we’ll take A2’s value and change it from
Joseph to John:
Option Explicit

Public Sub SetCellValue()
    Dim cellRange As Range
    Set cellRange = Range("A2")
    cellRange.Value = "John"
    Debug.Print cellRange.Value
End Sub
First we set the variable cellRange to A2. Then we said
cellRange.Value = "John" which changes the variable’s .Value property.
Remember, though, that the variable is a reference to cell A2, so whatever you
do to that variable, you also do to cell A2 in the worksheet. Finally, we
output the value of A2 into the Immediate Window to see that it changed.
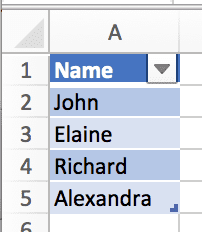
We can also see the value changed in the worksheet after we run this code:
How do you set multiple cells’ values?
Remember how I said that you can only read from one cell using .Value? Well,
when setting values, you can actually set multiple cells at one time by using
.Value. Take a look at the following code:
Option Explicit

Public Sub SetCellValue()
    Dim cellRange As Range
    Set cellRange = Range("A2:A5")
    cellRange.Value = "John" ' Will set ALL values in the range to "John"
End Sub
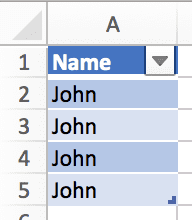
If you ran this code, it would set all A2:A5’s cells to John:
…whoops.
Well, maybe you’d actually want to do this for some other scenarios, like when you want a bunch of cells to repeat a value.
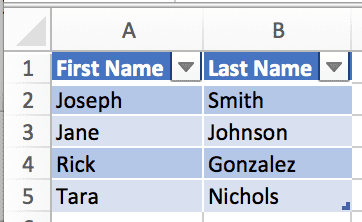
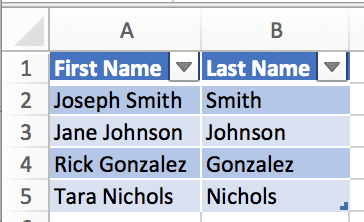
Let’s take a real example for a second. Let’s say we have two columns,
First Name and Last Name. We want to take the Last Name column and place
its value after the First Name’s value; essentially combining the values to
make a single Name column.
Here’s our sample data:
Our task is to combine the first and last name columns and place the result in
column A. How do we do that?
One solution is to loop through cells A2 through A5 and then set that cell’s
value to its own value, plus a space, plus the last name of the cell right next
to it.
Sounds easy enough, let’s code it up:
Option Explicit

Public Sub SetCellValues()
    Dim names As Range
    Set names = Range("A2:A5")

    Dim cell As Range

    For Each cell In names
        cell.Value = cell.Value & " " & cell.Offset(0, 1).Value
    Next cell
End Sub
Let’s step through the code.
- First, we create a variable called
names. Then, we set that to rangeA2:A5. - Next, we create a variable called
cell. This is going to be a temporary variable that will change with each iteration of the loop. -
Then, we create the loop. Here, we’re looping through the
namesrange object and setting the current item to thecellvariable. This means that each time we run through the loop,cellrepresents a single range object.*The first time the loop is run,
cellis set toA2. Then,A3, nextA4, and finallyA5. After that, there are no more cells to go through in thenamesvariable, so the loop ends.- I’ll go over how to loop through ranges in a future post since this post is already long enough!
-
Now we’re ready to combine the first and last names. How we do that is with another Range function called
Offset(_rows_, _columns_). The idea with this function is that if you’re on a cell likeA2and you saycell.Offset(0, 1)what we’re really saying is “move over one column to the right”. This puts us on cellB2. That’s how we’re able to get the last name in our example.- I’ll discuss how to use the
Offset()function in more detail in a future post. Again, this post has gone on long enough.
- I’ll discuss how to use the
Here are the results of the code after we run it:
From here, we could change the A1 cell to just Name and delete column B
altogether.
Getting and Setting Cell Values from a Named Range or Table Name
One last thing I’d like to touch on is when you use the Range() function, you
can use a named range or table name instead of a range like A2:A5. In our
first example, our data is in a table named Table1. To refer to the data of
the table, we could use the following:
Option Explicit

Public Sub GetCellValue()
    Dim cellRange As Range
    Set cellRange = Range("Table1")
    Debug.Print cellRange.cells(1, 1).Value
End Sub
And to refer to the entire table, we can leverage structured references like so:
Option Explicit

Public Sub GetCellValue()
    Dim cellRange As Range
    Set cellRange = Range("Table1[#All]")
    Debug.Print cellRange.cells(1, 1).Value
End Sub
This will return A1’s value “Name” since the table starts in A1.
Also, if you’re new to Excel Tables, click here to learn more.
What’s next?
Honestly, there is so much to discuss with range objects in VBA. I’ll be touching on many more topics regarding ranges in VBA in upcoming posts such as:
- Modifying cell colors
- Finding cells by their text values
- Filtering data
- Getting the last row in a range (you need this more often than you think)
I’ll come back to this post and put links to these posts as I create them.
If you enjoyed this content, please share and subscribe!
