How to Create a Drop-down List in Excel
October 19, 2015
You finally did it. You’ve just created an awesome Excel form that will let your team log data about how much time they are spending on their projects. With this new form, you can easily make reports that will show how much effort is given to all projects, identify bottlenecks, and determine which projects are taking more time to complete than originally estimated. Who knows? This new form may just transform your life by skyrocketing your career right up that corporate ladder. Here’s what it looks like:
![]()
Wow. Amazing.
You proudly give a copy of this workbook to everyone in your team and after some persuasion, your teammates agree to fill out the form and send it to you weekly.
A week passes and you start getting the data back. You notice that your teammates put different variations of their project names in your form. This causes some reporting problems for you. For example, if you want to find out how much percentage of time one project receives over another, you’ll have to massage the data and clean it up. Take a look at the following to see what I mean.
Here’s the bad data:
![]()
And here is the inaccurate report:
![]()
Take a look at the chart. Notice that there are different segments for the different spellings of the projects (Project A versus ProjA). This can cause a lot of pain when trying to create a meaningful report.
So you talk to your teammates about this new workbook and they say that the it’s helpful, but there’s a lot of typing. They end up using inconsistent (i.e. shorter) naming conventions for their project names as shown above.
There are two problems to fix:
- Your teammates have to type too much and now they don’t want to fill out the form.
- You have to cleanup the data you get back before you can make a meaningful report.
However, there is a solution to this issue that helps both you and your teammates: drop-down lists.
Drop-down lists are a great way to keep your data consistent
![]()
When you have inconsistent data, it can wreak havoc in your spreadsheets life. You will end up having to clean it up or adjust your formulas to accommodate your reports.
The solution? Drop-down lists.
With drop-down lists, you can control the type data your users can use, allowing users to type less and have your reports stay consistent. A win-win.
Does this article help you? If so, please consider supporting me with a coffee ☕️
How to create a drop-down list in Excel
There are several ways to create a drop-down lists in Excel, but I would like to share the method that I have found most useful.
Create a new worksheet that will hold all of your lists. I usually call this sheet “Lists.”
Then, create a meaningful name for your list. For this example, we’ll call it “ProjectNames.” Then, in the cells below, write down all of the project names you’d like to track.

When you have your list ready, we’ll turn that list into an Excel Table. Select the data, then click on Home -> Format As Table -> Select a Format

Excel will ask you if your Table has headers, make sure to enable that checkbox.

Give this Table a meaningful name. We’ll use “ProjectNames” for our Table name. This will come in handy later when we make the drop-down list. With the table selected, there will be a new Ribbon tab called Design, click this, and then under Table Name put “ProjectNames”.

Now go back to your project tracker worksheet. Select the cells where you want the user to have a drop-down list for project names.
Click the Data tab and select Data Validation. A window will open.

In the new Window, under Settings, select List under the “Allow” label. Then, in the Source section, we need to tell Excel that we’d like to use our Excel Table called “ProjectNames”. To do this, we need to use the INDIRECT() function. The format goes something like this:
=INDIRECT("TableName[TableHeaderName]")Since we called our table “ProjectNames”, and the header name is “Project Name”, here is the formula we need to use:
=INDIRECT("ProjectNames[Project Name]")

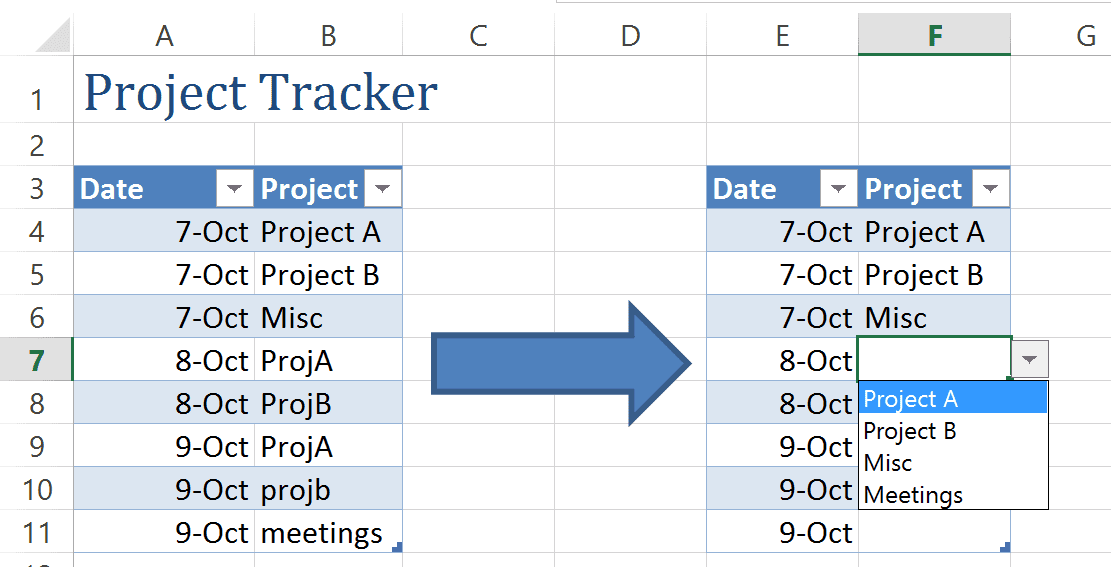
Click OK. Let’s look at the outcome:

Great! We now have a drop-down list for our Project Name column.
However, take a look at the green ticks in the top-left section of some of the cells. Notice that they only appear for the Project Names that are not in our Excel Table. This is Excel letting you know that you have some bad data.

The simplest solution here is to go and fix all of the data, like so:
![]()
And now your report is fixed as well:
![]()
Also, when a user tries to enter in a Project Name that is not in the drop-down list, an error message will pop-up:

What if I want to add other Project Names to the list?
You have a couple of options here that I would recommend.
- Allow users to add data that is not found in the Data Validation drop-down list
- Force the user to add the new Project Name to the Excel Table
Allow Users to Add Data Not Found in the Data Validation Drop-down List
This option is pretty flexible, but you may run into inconsistent naming, so be careful with choosing this option. However, if you feel that it will give your users more options, then feel free to use this.
We will need to update the way Excel handles data entered that is not in the list. Select the cells for the drop-down list and click Data -> Data Validation.
In the Data Validation window, click on the Error Alert tab. Here, you can either turn off the warnings completely by unchecking the “Show error alert after invalid data is entered” or you can opt for a Warning pop-up, which you can customize the message and urge your users to add the Project Name to the ProjectNames Excel Table.

In this example, I chose the Style to be Warning, and added my own Title and Error Message. Change these settings to suit your needs.
Now, when a user tries to enter a new Project, let’s say Project C, the Warning will pop-up:

At least with this method, you encourage your users to “do the right thing” by entering the new Project Name to the ProjectNames table. If you’d like to know how to add the new item to the list, please see the next section.
Force the User to Add the New Project Name to the Excel Table
This method is built in by default, as we saw earlier:
However, this message is pretty vague and can frustrate the user who isn’t aware of how to fix this.
Select the data with the drop-down lists and bring up the Data Validation window, click on the Error Alert tab and set the values like so:

Earlier, we gave the user a Warning, but still allowed them to enter the data into the form. Here, we put the Style to Stop, and will not allow the user to enter any data that is not already in the list.

Adding a New Project to the List
Adding a new project to the drop-down list is simple now that we’ve setup the list as an Excel Table. Simply go to the Lists worksheet, go to the end of the ProjectNames list and add your new project name:

Because this is an Excel Table, when you press Enter, the new Project Name will be added to the list as part of the Table:

This means that your Data Validation will adjust automatically and add the new Project Name to the list.

Sorting the List
One last tip about this list: you can sort the list by sorting the Excel Table for the list in the Lists worksheet. Just click in Project Name (the header row), then click Sort A to Z:

Now your list will be sorted:
")